
 Request a free trial
01. Overview
IRiS turns your source data into a silver layer data model that's ready to be built, capturing all the governance and ontology needed to generate your target codebase.
For each source table, IRiS proposes a model using a mix of rules and AI analysis, explains its reasoning, and keeps you in the loop. It isn't a platform — it's a human-in-the-loop assistant that helps you repeatably produce a well-modelled, standardised platform.
Point IRiS at your source table to pull the schema and sample data automatically.
-
Add your source — provide the table, sample data, and context.
-
Identify business keys — IRiS proposes the columns that uniquely identify a business entity.
-
Review proposed data model — IRiS presents the full model with its reasoning; you approve it or send it back to revise. The model grows piece by piece with your input.
-
Generate your files — IRiS produces your metadata, governance, and code files, ready to deploy or push to source control.
02. Prerequisites
A few things need to be in place before you can model your first table. Most are one-time setup.
- A licence and an active seat — IRiS checks that your organisation is licensed and that you have an active seat. If you see "access restricted," your organisation is licensed but you don't yet have a seat — ask your IRiS administrator to add you.
- A supported source platform — IRiS connects directly to Snowflake, Microsoft Fabric and Databricks. If your data lives elsewhere, you can still model by pasting the table definition in manually, but the connect-and-extract features won't be available.
- Read access to the tables you'll model — the account IRiS connects as needs permission to read the table structure and sample data.
- An LLM provider — IRiS uses an LLM to propose models.
- For Fabric users — an Azure app registration — set this up before creating a Fabric connection (see Setting up Fabric access).
- Source Control – Source control is optional infrastructure a user configures once. If you are looking to direct your IRiS files to Azure DevOps, you will need a repository set up in Azure DevOps and a personal access token (PAT) with scope set to Read and Write for Code.
A couple of things worth knowing up front:
- Very wide tables are split first. IRiS supports source tables up to 300 columns. A wider table is rejected at the first step with a message asking you to split it into narrower tables before submitting.
- Sample data is optional but helps. You don't need sample data to model a table, but providing it — or connecting to a platform that can pull it automatically — sharpens IRiS's business-key analysis.
- Saving files to a folder works best in Chrome or Edge. The direct save-to-folder option uses a browser feature available in Chrome and Edge; in other browsers, files download individually instead.
03. Setting up Fabric access
Before you can create a Fabric connection, a few things need to exist in your Azure environment. This is one-time setup.
What you need
- A Fabric workspace with capacity — the workspace your source data lives in, backed by an active capacity.
- A lakehouse with a SQL endpoint — IRiS reads through the lakehouse's SQL analytics endpoint. Create a landing schema in the lakehouse for the tables you'll model.
- An app registration in Entra ID — this is what lets IRiS sign you in (see How Sign in with Microsoft works below). From it you'll need:
- the application (client) ID, and
- a redirect URI set to your IRiS instance's web address, registered as a single-page application (SPA).
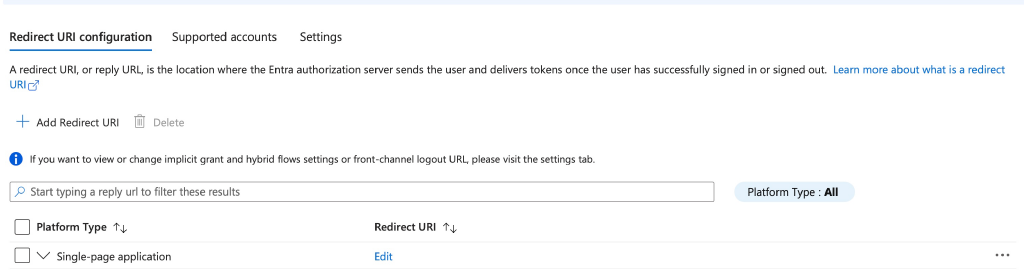
Your IRiS address is on the Azure overview page for the container whose name ends -assistant. It looks like: https://<clientname-identifier>-assistant.<region>.azurecontainerapps.io
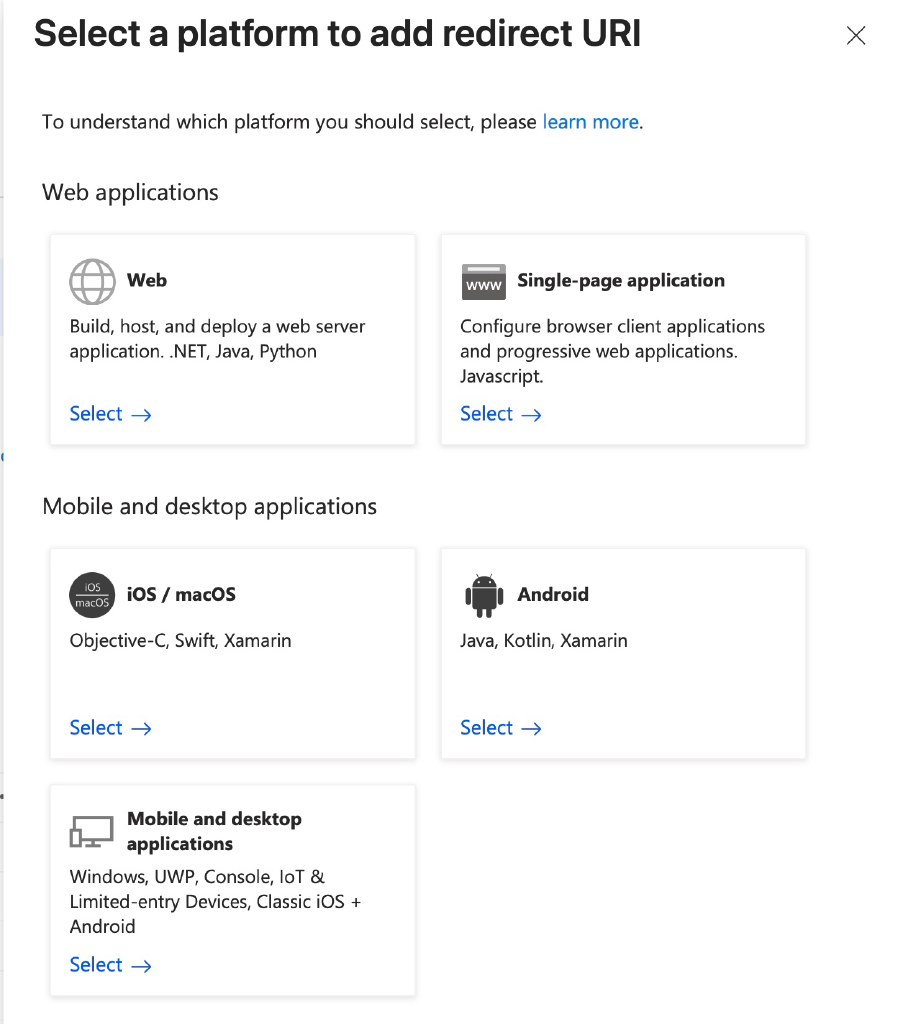
How Sign in with Microsoft works
When you create the connection, you'll enter a Client ID and a Tenant ID. Here's what they're for, so the fields make sense.
An app registration is an entry in Azure that gives IRiS permission to ask you to sign in — it tells Microsoft "this application is allowed to show a login, and here's where to return the user afterwards." It isn't a login itself, and it holds no one's password.
When you connect, IRiS uses that app registration to open a Microsoft login in your browser. You sign in there with your own Microsoft account. Microsoft then hands IRiS a token confirming you're signed in, and IRiS uses it to read Fabric as you, with your own permissions.
So the two IDs identify the app that's allowed to ask, and your login supplies who you are. The Tenant ID is your Azure organisation's identifier (easy to get from your Azure admin or the Azure portal); the Client ID is the app registration's identifier.
04. Supported Datatypes
IRiS supports nearly all datatypes native to your target platform. A small number of platform-specific types — such as Snowflake's variant, object, and array — are known not to be supported. These are flagged during source review so you can convert or remove the affected columns before generating files.
05. Usage
Working with IRiS is a guided conversation. IRiS moves through various stages, and at each one IRiS does the analysis, suggests outcomes to you and you review and confirm. You can revise or push back at any point — nothing is finalised until you approve it.
Add your source
Start by giving IRiS the table you want to model. Either connect directly to your platform or paste in the table code itself and let IRiS derive the schema and, where available, IRiS will sample data automatically. IRiS reads the structure and confirms what it found. You'll also provide a little context about the table (where it comes from, how it loads, who owns it) so the output is named and governed correctly. Confirm the source looks right, and IRiS flags anything that needs your attention before moving on.
Identify business keys
IRiS proposes the columns that identify each business entity in the table, and explains why. Where sample data is available, it shows supporting evidence to back each suggestion. Accept a proposal, point IRiS at a different column, or skip — whatever fits the table. For tables that cover more than one entity, IRiS works through them with you one at a time.
Review proposed data model
IRiS builds the model from your confirmed keys and presents it for review, with its reasoning laid out. Take a look, and if something isn't right, describe the change in plain language and IRiS regenerates the model with your direction applied. The model comes together piece by piece, with you steering. When it looks right, you approve it — and confirm the business definitions IRiS drafts alongside it.
06. Revisions
If the model isn't quite right, tell IRiS what to change in plain language and it regenerates with your direction applied. Each session allows a set number of revisions, so aim to describe the full change you want rather than nudging one small thing at a time.
You can ask IRiS to, for example:
- Move a satellite to a different parent — e.g. "Move the satellite with
customer_nameandcustomer_emailonto the customer hub instead of the link." - Split attributes across satellites — e.g. "Put
order_amountandorder_currencyon their own satellite." - Re-parent descriptive columns — e.g. "The product attributes should sit on
h_product, not the link."
Describe the outcome you want, not the mechanics — IRiS works out the change.
07. Business definitions
Once you've accepted the model, IRiS writes a plain-language business definition for each hub and link — a short description of what that entity or relationship represents.
Where an entity/hub already exists in the registry with a stored definition, IRiS reuses it and marks it from registry. You don't need to review those again unless you want to change something. New hubs, and all links, get a freshly drafted definition marked proposed — these are the ones to review and confirm.
08. Generate your files
When you're happy with the model, IRiS produces everything the build needs and cross-validates it before delivery. You can save the output to a local folder or push it straight to a connected repository.
Delivery options
- Save to a folder — Choose a local folder and IRiS writes the files there. In supported browsers this is a single action; otherwise the files download individually.
- Push to a repository — Send the files straight to a connected Git repository. Set the connection up in Settings first.
Files ready for download or repository push
09. Exporting to a graph ontology
An IRiS model can also be exported for use in a graph ontology — a graph-native view of your model, such as Microsoft Fabric's ontology. This is an optional output for teams working on graph platforms; it doesn't change the model or the standard files.
A graph ontology represents every relationship as a direct connection between two entities. Because of that, only pairwise relationships map cleanly:
- Each link connects exactly two hubs. A link joining three or more hubs has no single two-entity connection to map to.
- No satellite sits on a link. Descriptive attributes need to live on a hub, not on the relationship itself.
A model that doesn't meet both conditions is still a correct, valid Data Vault model — it simply can't be represented as a graph ontology without restructuring. If you need to export one, revise it so its links are pairwise and any link attributes move onto a hub (see Revisions).
10. Tabs
Chat
Chat is where the modelling happens. The whole workflow runs here as a guided conversation — IRiS proposes, you confirm, and the model takes shape between you.
The tab is split into three panels:
- The conversation (left) — where you and IRiS talk. IRiS asks questions, explains its reasoning, and presents each proposal; you respond, confirm, or ask for changes in plain language.
- Model details (top right) — a running summary of what you've settled so far: the source, the confirmed business keys, the entities taking shape.
- Model preview (bottom right) — a live graph of the model as it's built, updating as you confirm each piece.
Everything you need for a modelling session is on this one tab; the Model and Registry views are for reviewing what you've built.
The model
The Model tab shows your model as an interactive graph. It's the quickest way to see the shape of what you've built and how entities relate.
You can view the model from your current session, as it stands. This updates live while you work, so you can watch it take shape as you confirm keys and IRiS builds it out.
The registry
The registry is IRiS's memory of everything you've modelled. Each time you complete a model, its entities and business definitions are saved to the registry, and it builds up across sessions and projects.
Its main job is consistency. When you model a new table, IRiS checks the registry first — if an entity you're modelling already exists (say, a customer entity you defined last week), IRiS reuses its established name and definition rather than inventing new ones. That's how the same business concept stays named and defined the same way everywhere, no matter who models it or when.
You can browse the registry from the Registry tab — every IRiS entity with version history, audit logs, and flagged PII patterns. The Model tab's Registry view shows the same entities as a graph.
The registry accumulates over time. If you need to start fresh, Clear Registry empties it — you'll be asked to type "REMOVE ALL" to confirm, since it can't be undone.
Settings
Settings is where you set up the connections and preferences IRiS uses throughout a session. Anything you configure here is available in the Chat workflow.
Profile
Display name — your name as it appears in IRiS. It's used as the default source owner on new modelling sessions, so the models you create are attributed to you without having to fill it in each time. You can change it at any time; it only affects new sessions.
Connections
IRiS uses two kinds of connection, both set up here. A connection is saved once and reused across sessions.
Data platform connection
This lets IRiS read table structures and sample data directly from your source, and see what's already deployed. You'll need a few details from your platform, plus a way to authenticate.
What you'll provide:
- Name — a label of your choosing, so you can recognise the connection later (e.g. "Production Snowflake").
- Account / server — the address of your platform instance. For Snowflake this is your account identifier (the part before
.snowflakecomputing.comin your login URL — your platform admin can confirm it). For Fabric it's the SQL endpoint of your warehouse or lakehouse. - User — the account IRiS signs in as. Use a dedicated service account where you can, rather than a personal login.
- Warehouse / role (Snowflake, optional) — the compute warehouse and role IRiS should use. Leave blank to use the user's defaults.
- Authentication — how IRiS proves who it is. The options available depend on your platform (see below).
Authentication methods:
How IRiS signs in depends on your platform.
Snowflake — Key pair
IRiS authenticates with a private key rather than a password. You (or your admin) generate a key pair, register the public key against the Snowflake user, and paste the private key into IRiS. If you haven't set one up before, follow Snowflake's own "key-pair authentication" guide — it covers generating the key and attaching it to the user. The private key you paste is encrypted before it's stored and never shown again.
Fabric — Sign in with Microsoft
Fabric authenticates through an Azure app registration you set up first (see Setting up Fabric access). You log in interactively with your own Microsoft account, and IRiS connects as you, with your own permissions. Needs the tenant ID and client ID.
Test it. Once saved, use Test — IRiS connects and lists the databases it can see. If the test fails, the message tells you what went wrong (wrong account, permissions, unreachable host) so you can fix it before relying on the connection.
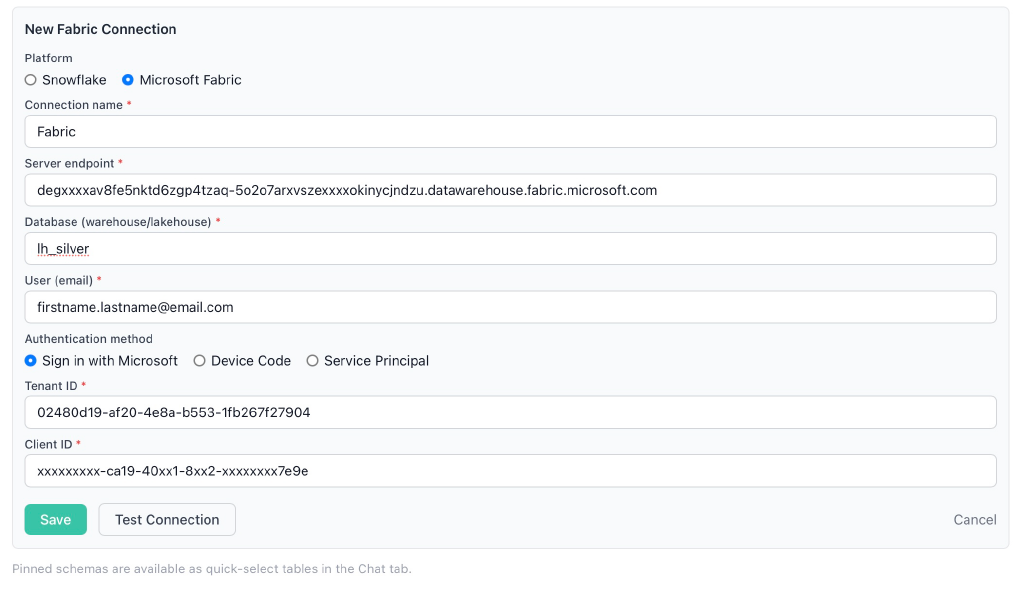
Creating a Microsoft Fabric connection
- Go to the Settings tab and find Target platform and connections.
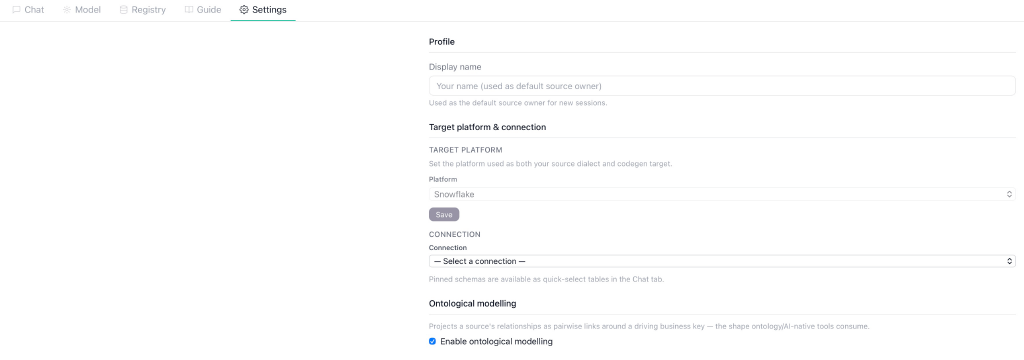
- In the connection dropdown, select New connection.
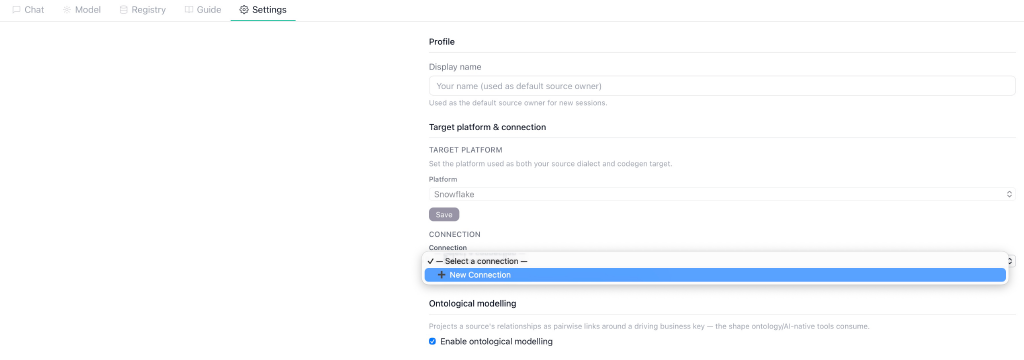
- Choose Microsoft Fabric, then fill in:
- Connection name — any label you like, so you can recognise this connection later.
- Server endpoint — the lakehouse's SQL endpoint, from its connection string. It looks like
<hash>.datawarehouse.fabric.microsoft.com. - Database — the name of your lakehouse.
- Authentication method — Sign in with Microsoft.
- Tenant ID — the tenant your Fabric workspace lives in.
- Client ID — the application (client) ID from the app registration above.
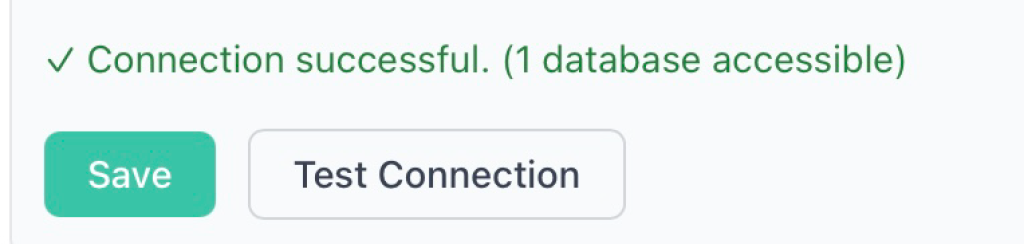
- Select Save, then Test. A Microsoft login should pop up for your account — sign in, and IRiS confirms it can reach the lakehouse.
Setting Up Source Control
If you want IRiS to push generated files straight into Azure DevOps rather than downloading them, set up a source control connection. This is optional — skip it if you only ever save to a folder.
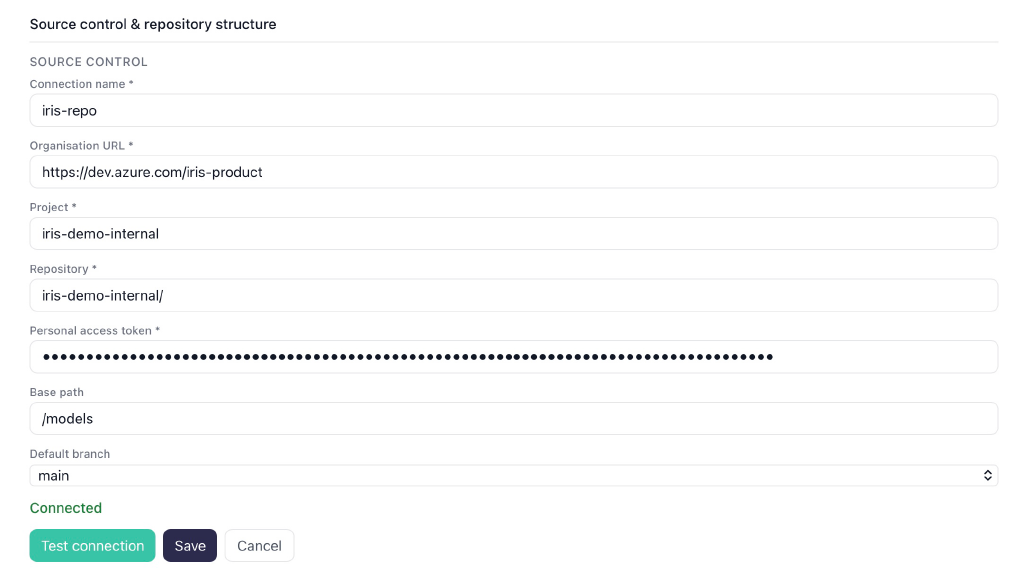
- Go to Settings and select Add connection.

- Enter the connection details:
- Connection name — any label you like for this source control connection.
- Organisation URL — your Azure DevOps organisation URL, e.g. https://dev.azure.com/iris-demo/.
- Project — the name of your project in Azure DevOps.
- Repository name — the repository IRiS will push files to.
- Personal Access Token — the PAT you created in Prerequisites (Read & Write scope for Code).
- Base path — the folder in the repository where models and the governance file will be written.
- Select Save, then Test to confirm IRiS can reach the repository.
Ontological modelling
Ontological modelling changes the shape of the model IRiS builds, so it can be represented as a graph which favours ontological and AI-native tools to consume. It's a setting you turn on or off in Settings; it's on by default.
A standard Data Vault link can join several hubs at once. A graph, though, represents every relationship as a connection between exactly two entities. With ontological modelling on, IRiS builds relationships in that pairwise form: instead of one link across many hubs, it creates a set of two-hub links radiating from a central driving hub — the entity the relationship is organised around. IRiS chooses the driving hub for you (usually the most connected entity), so there's nothing extra to configure. Descriptive attributes stay on hubs, never on the relationships.
With ontological modelling off, IRiS builds classic Data Vault, where a single link can span three or more hubs. The model is still correct and complete — it just isn't in the pairwise shape a graph needs.
You don't have to choose up front for technical reasons — the mode changes only how relationships are arranged, not what data is captured or the files IRiS generates. Turn it on when you want a model that can be projected to a graph ontology (see Exporting to a graph ontology); leave it off if you're working purely in classic Data Vault.
Pinned schemas
After connecting, choose the database and schema combinations you want to work from. IRiS lists tables from these pinned schemas in the Chat table picker, so you're selecting from a focused list rather than your whole platform. You can update your pinned schemas at any time.
Target platform
The target platform is the platform IRiS builds for — it sets both the SQL dialect IRiS reads your source in and the platform its generated code targets. Set this before you start modelling; everything IRiS produces is shaped for it.
Choose your platform from the Platform dropdown and select Save.
- Snowflake — no further details are needed here; the platform choice is all that's required. (Your source connection is set separately, under Connection.)
- Fabric — a few extra identifiers appear, used to target the right Fabric location:
- Lakehouse name — the lakehouse IRiS builds against (e.g.
lh_silver). - Lakehouse ID — the lakehouse's unique identifier.
- Workspace ID — the identifier of the Fabric workspace the lakehouse lives in.
- Lakehouse name — the lakehouse IRiS builds against (e.g.
The Workspace ID is the /groups/<id>/ segment of your Fabric workspace URL; the Lakehouse ID appears in the lakehouse's details in Fabric.
Target platform vs. connection. These are two different settings. The target platform is what IRiS builds for. The connection, chosen just below, is where IRiS reads your source from. They should be the same platform, but you set them separately.
Repository structure
When IRiS pushes to source control, it writes each generated file to a folder path. Repository structure lets you control that layout, so pushed files match your repo's conventions. It only affects where files are placed — never their contents. If the default layout suits you, you can leave this alone.
The path template
Each file's folder path is built from a template. The default is:
{layer}/{kind}/{name}
The tokens are filled in per file:
{layer}— the layer the object belongs to (e.g. vault, stage, load).{kind}— what the file is for (see Kind folders below).{name}— the file itself, exactly as IRiS generated it. This must always be the last token.
So a hub table lands at vault/table/h_customer, a load procedure at load/storedprocs/…, and so on. You can reorder the tokens, add fixed folder names of your own, or use the extra tokens {source}, {table}, and {schema} if you want to namespace by source or table. The only rule: {name} comes last.
Kind folders
{kind} groups files by purpose. A model produces several kinds — table (the definitions), storedprocs (load and update procedures), views (reporting and current-state views), and orchestration helpers like deploy, ingest, and cleanup. By default each kind becomes its own folder of the same name.
You can rename any kind's folder to something else. The common reason is Fabric: Fabric works in notebooks, so grouping everything except table definitions under a single notebook folder keeps a Fabric repo tidy. You'd do that by mapping each kind (storedprocs, deploy, ingest, cleanup_ddl, cleanup_proc, ghost, …) to notebook, and leaving table as-is.
Any kind you don't rename keeps its generated folder name — and if new kinds of file appear in future, they'll use their default names until you choose to map them. A folder name can't contain a / (renaming a kind changes one folder, it doesn't create nested folders).
Security
Credentials such as private keys and secrets are encrypted before they're stored and are never shown back to you once saved. To change a key, enter a new one; leaving it blank keeps the existing one in place.
Model bundle
A model bundle is a complete snapshot of every model in your IRiS instance — across all projects, each at its latest version — packaged as a single file. It's for backup, recovery, and moving your models to a fresh instance, not for day-to-day delivery. (For the files that build a single model, use Generate your files instead.)
Export
Produce a bundle of the current state of every model in the instance:
- Download bundle — download the whole-instance snapshot as a .zip.
- Push bundle to repository — commit the same snapshot to your connected Azure DevOps repository, under a
bundle/folder. Requires a source control connection.
Import
Replay a bundle back into an instance — for example, to restore after a rebuild, or to seed a new instance from an existing one. Two modes:
- Rebuild from bundle — for an empty instance. Replays the bundle in bulk to reconstruct all its models from scratch.
- Augment from bundle — for a populated instance. Tops it up with the models from the bundle, adding recent work without wiping what's already there.
LLM Models
IRiS works with a configurable LLM provider. Not every model produces reliable results, so Ignition evaluates specific models and marks the ones we recommend. You can select others, but anything outside this set is untested — see Using an untested model below.
Recommended models
The table below shows the models Ignition has evaluated against a curated set of reference modelling scenarios, and whether we recommend them for production use.
| Provider | Model | Status |
|---|---|---|
| Anthropic | claude-sonnet-4-6 | Recommended |
| Anthropic | claude-opus-4-6 | Recommended |
| Azure AI Foundry | gpt-4.1 | Recommended |
| Anthropic | claude-haiku-4-5 | Evaluated — not recommended |
| Azure AI Foundry | gpt-4o | Evaluated — not recommended |
Models marked Evaluated — not recommended didn't meet the quality bar — this is different from a model simply being untested; Ignition has already looked at these and made a call. The Anthropic model in this tier isn't offered in the Settings selection; the Azure deployment can still be entered manually (Azure deployments are always free text), but isn't recommended.
How models are evaluated
Each candidate is run through the complete IRiS modelling workflow against a curated set of reference source tables — spanning single-entity, multi-entity, CDC, PII-heavy, and registry-reuse cases. Each run is scored for structural correctness (hubs, links, satellites), business-key identification, naming consistency, and definition quality, then repeated to confirm the result is stable rather than a one-off. A model is recommended only when it clears our quality bar consistently across the full set. Structural and naming checks are automated; every model IRiS produces is also reviewed by you before delivery.
Using an untested model
You can point IRiS at any Anthropic model in the recommended list, or at any Azure AI Foundry deployment you control. Azure deployments are your choice and aren't tested by Ignition — if you use one, output quality is your responsibility. Where a tested model is available, we recommend using it for the most reliable results.
Session details
Each working session has its own identifiers, shown at the bottom of Settings:
- Session ID — identifies your current session.
- Version — identifies the version of IRiS you're running.
Use the Copy button next to each when contacting support or reporting a problem — quoting them helps us find and diagnose the exact session quickly.
Session Status
A status light in the top-right corner of the header shows how your session is doing. One glance tells you whether there's anything to act on.
- Green — Session is healthy. No action needed.
- Amber — Session is aging. Still fine, just a heads-up.
- Red — Closing in. A countdown appears, along with an "I'm still here" button.
- Final alert — Act now. The session is seconds from ending.
The 15-minute rule
If 15 minutes pass with no action, the session ends and any in-progress work is cleared. This is expected behaviour, not an error — it keeps abandoned sessions from piling up. Start a new session to continue.
Reading isn't activity
Scrolling through the chat or reading a model proposal doesn't reset the 15-minute clock — only actions do (confirming a step, answering a question, submitting a decision). If you're taking time to review something, the clock keeps running underneath.
Staying in while you read
When the light turns red, an "I'm still here" button appears next to it. Click it any time to reset the 15 minutes without losing your place — no need to click through the workflow just to stay connected.
11. Terminology
- Source Extract Date (SED) — The timestamp column indicating when data was extracted from the source system. Used for load sequencing in the vault.
- CDC (Change Data Capture) — A source that tracks row-level changes (inserts, updates, deletes) rather than delivering full snapshots. IRiS models CDC sources with dedicated satellite subtypes.
- Registry — The canon registry stores all confirmed hubs, links, satellites, and their business definitions across sessions. When you model a new table, IRiS checks the registry first to reuse existing entities and their definitions.
- Graph ontology — A graph-native representation of your model, where each relationship is a direct connection between two entities. IRiS models can be exported to a graph ontology (such as Microsoft Fabric's) when every link is pairwise and no satellite sits on a link. See Exporting to a graph ontology.
12. Troubleshooting/FAQ
I see "access restricted" when I open IRiS.
Your organisation is licensed, but you don't have an active seat yet. Ask your IRiS administrator to add you. (A licence covers the organisation; each user also needs a seat.)
My connection test fails.
The test message tells you which of three things went wrong:
- Authentication failed / wrong credentials — check the account or server address, the user, and your key or secret. For Fabric, confirm the app registration is set up and consented (see Setting up Fabric access).
- Insufficient privileges — the connecting account can reach the platform but lacks rights on the data. It needs read access to the tables you're modelling.
- Host unreachable — IRiS can't reach your platform over the network. If your platform restricts access by IP or private endpoint, your IRiS instance's address may need to be allow-listed. Your platform admin can arrange this.
My Fabric sign-in isn't working.
Almost always the app registration. Check that it exists, that your IRiS instance's address is registered as a single-page application (SPA) redirect URI, and that you're signing in with an account that has access to the Fabric workspace. See Setting up Fabric access.
I get a message that my table has too many columns.
IRiS supports source tables up to 300 columns. A wider table is rejected at the first step. Split it into narrower tables and model them separately.
My table isn't showing in the table picker.
Two common causes:
- The table's schema isn't pinned. Pin the database and schema it lives in (see Pinned schemas).
- The connection is for a platform other than the one this session is targeting. A session works with one platform at a time; connections for the other platform are hidden until you switch.
A column is flagged as unsupported.
A few platform-specific types can't be modelled (see Supported Data Types). Convert the column to a supported type in your source, or remove it, then extract the table again.
The model changed, but I didn't spend a revision.
That's expected. When a proposal doesn't meet IRiS's internal modelling rules, IRiS adjusts and re-proposes on its own — that doesn't count against your revisions. Your revision count only goes down when you ask for a change.
My session ended and I lost my work.
Sessions close after a period of inactivity, and in-progress work is cleared (see Session Status). Reviewing or reading doesn't count as activity — only actions like confirming a step do. When the status light turns red, use the "I'm still here" button to stay in. Start a new session to continue.
A file didn't save where I expected.
The direct save-to-folder option works in Chrome and Edge; other browsers download the files individually instead. Check your downloads folder, or switch to Chrome/Edge for the single-folder save.
Some of my links won't export to a graph ontology.
A graph ontology can only represent relationships between two entities, so a link joining three or more hubs — or a satellite attached to a link — can't be mapped. The model is still valid Data Vault; to export it, revise it so links are pairwise and move any link attributes onto a hub.
My files won't push to Azure DevOps.
Check the source control connection in Settings. The most common causes are an expired or wrong-scoped Personal Access Token (it needs Read & Write for Code), a project or repository name that doesn't match, or the organisation URL being mistyped. Use Test on the connection to see which.
IRiS Assistant — Ignition Data Management
Questions or feedback? Contact IRiSSupport@ignition-data.com